Friday, January 2, 2009

Cloth Diaper Styles: Diapers Covers part III: Polyester Fleece

Polyester fleece, better known by the original trade name of Polarfleece, was invented by Malden Mills in 1979 as a synthetic, easy-care version of wool. Using fine brushed polyester fibers attached to a polyester knit "substrate," a non-shrink, machine-wash (and dry)-able high-loft fabric with wicking properties was created. Fleece is now readily available in local fabric stores and easily repurposed from fleece throw blankets, although the very best fleece for diaper covers (known for the best protection and best anti-pill construction) is still 200 (or 300) weight fleece from Malden Mills.


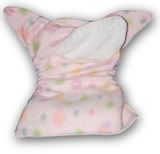
This side-snapping modified Fattycakes side-snapping diaper cover was made by the author using Malden Mills 200 wt. fleece as the outer, and Malden Mills microfleece as the inner. The snaps in this superior fleece were well-reinforced and are still going strong!

Regardless of the maker, fleece does have a tendency to pill over time to some degree, and this is exacerbated by washing and drying fleece items with natural fibers, especially cotton. This causes the fleece to pick up "fuzzies" and shortens the life of the item.

Because polyester fleece is not absorbent (unlike wool covers which can absorb up to 30% of their dry weight before feeling wet) fleece covers over saturated diapers will compression leak (also known as compression wicking), and fleece often can't withstand a forceful or volumeful stream of urine.


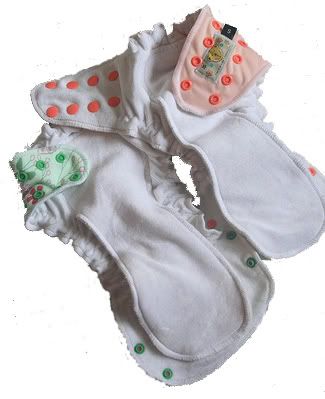
These three fleece "soakers" were made by Carson of Fuzzy Britches.

Fleece is almost as breathable as wool, so for babies without synthetic allergies who need good air circulation to prevent diaper rash, it can be an easy-care, fairly inexpensive choice in water-resistant diaper covers.

Fleece can be used to make wrap-style covers in one or two layers, and is occasionally found as the outer layer of AI2 and AIO style cloth diapers. The "hook" side of hook-and-loop tape will stick to fleece, so using laundry tabs when washing is very important! Because of the stretch of the fabric, it can be difficult to adequately reinforce snaps in fleece, so care (and testing) should be done before investing in a complete "stash" of snapping fleece cloth diapers.


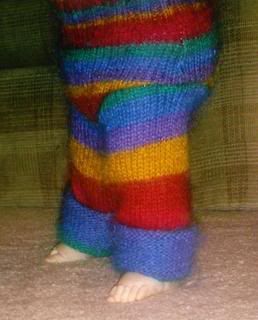
These fleece longies (with attached soaker for extra wetness protection) were made by the author using fabric-store patterned fleece.


Fleece can also use its stretch to an advantage, in the form of comfortable "soakers," "shorties," "longies," and even "skirties." Even store-bought fleece shorts and pants will work as a diaper cover. When using fitted diapers or well-secured prefolds, this makes dressing baby very easy--the diaper cover and "bottoms" are one.

Tuesday, September 30, 2008

Cloth Diaper Styles: Diaper Covers part II: Wool

WOOL

The natural, classic choice in diaper covers, wool fiber is used in several forms.
Pure wool or wool blend yarn can be used to knit or crochet pull-on diaper covers called "longies" (which look like pants) or "shorties" (which look like shorts), or to form a shaped "wrap" cover that fastens with a Snappi, hook-and-loop tape, or snaps. "Shorties" can be combined with a skirt for a little girl, called a "skirtie". These 100% pure wool shorties were crocheted by Krista of Nellybeans.

Wool fabric can also be used for covers. Knit fabrics like interlock make excellent pull-on covers with matching fabric bands at the waist and legs in place of elastic. Washable wool terry is also a knit and can be used in the same way. Wool flannel and other wool wovens can be used to sew wrap style covers.
This wool interlock pull-on cover was also made by Krista of Nellybeans.


Wool is particularly easy to find in clothing form for making recycled covers. Sweaters can be used to make recycled "longies", "shorties", or wraps. Wool skirts can be used as fabric for wrap style covers.
These 50% mohair 50% acrylic longies were made from a sweater by the author, using the directions from Bum Wrap below.


HOW WOOL WORKS and WOOL CARE

Wool is not water proof, but rather water resistant. Wool works by absorbing moisture and dispersing it evenly over the entire surface area. The saturation point (the amount of liquid that must be absorbed for a fabric to feel wet) of wool is quite high in comparison to other natural fibers, so any wool cover may feel slightly damp to the touch when the diaper underneath is saturated. This is the wool doing its job, and one reason why "pants replacement" styles are so popular for wool.

Wool is a very "breathable" fiber, and an excellent choice in the summer or in hot climates.

Wool will generally shrink (called "felting" or "fulling") if subjected to machine washing and drying (or even to vigorous scrubbing by hand or a sudden water temperature change). This phenomenon is helpful when you want to make a loose-knit wool sweater worthy of being turned into longies, but it can be disastrous if a person who is unaware of the special care requirements does your diaper cover laundry for you.

Almost all wool covers should be handwashed in cool water with gentle soap, rinsed thoroughly, and laid out on a towel to dry. The water resistance of wool can be enhanced by lanolizing the cover.


The recommendation?

Wool covers are breathable and economical (especially if you use recycled wool or can crochet or knit). If you are willing to invest the extra time in caring for wool covers, they are an excellent choice.

The pattern suggestions?

On the for-sale side, the Mile High Monkeys pattern is great for pull-on styles. Fern and Faerie offers patterns (both for-sale and for free!) for knit covers and recycled covers.

On the for-free side, try the Fern and Faerie patterns, the directions here for a recycled pull-on cover, the Bum Wrap's instructions for recycled longies from a sweater, the directions here for wool fabric wrap covers, or the excellent Katrina's Sew Quick Soaker Pattern for a pull-on cover.

Next, we'll discuss wool's synthetic cousin, polyester fleece!

Cloth Diaper Styles: Diaper Covers, part I: PUL

Previously, we've looked at kinds of cloth diapers that have the waterproof and absorbent layers attached in some way. There are some drawbacks to those styles, however. Both wear out faster because the entire diaper, waterproof layer and all, has to be washed every time the diaper is used.

But the waterproof layer is also available on its own to be used to provide wetness protection to a separate absorbent diaper underneath. Called a diaper cover, there are many options in style and fabric, allowing for great versatility in a "stash". Diaper covers that are not saturated or soiled can be aired out and reused several times before washing, meaning that fewer waterproof covers are needed for the diapers that go underneath. And having a separate cover also provides a secondary barrier to baby diaper messes.

We'll take a look at diaper covers in groups of the fabrics made to use them. Today, we'll discuss the most popular waterproof choice.

Polyurethane Laminated Fabric, aka PUL

A safer and more comfortable alternative to the vinyl "plastic pants" of the past, PUL is one of the most popular diaper cover fabrics. PUL is made by laminating polyurethane film to fabric, and the fabric was originally used for medical "splashguard" barrier clothing and surgical drapes that can be autoclaved (sterilized by high-pressure steam) and reused. PUL is one of the specialty diaper-making fabrics that are only found online. The polyurethane film comes in two thicknesses, 1mil or 2mil. The "waterproofness" is about the same in the two varieties, but 1mil is more stretchy and drapey, while 2mil is stiffer.

The most commonly available PUL is made with 100% polyester knit fabric, and provides the greatest waterproofness. But other fabrics like nylon and even cotton can have the polyurethane film laminated to them. Natural fibers that have been laminated will be more prone to "wicking" or moisture transference from the inside of the cover to the outside. There are methods of minimizing this effect, including using seam sealing tape to close sewing holes or using fold-over elastic instead of a turn-and-topstitch style.

Because of the "sticky" feel of the polyurethane laminate on the back side of the fabric, PUL is best suited to diaper covers that are lined with another fabric (often polyester fleece, suedecloth, or another layer of PUL with the fabric face out) made in the "wrap" style, and fastened with hook-and-loop or snaps. The excellent waterproofness of PUL comes at a trade-off: it is not a very "breathable" fabric, and can be hot during the summer or in hot climates.

This diaper cover from Artisty Baby at BabyDearest is made with 1mil polyester PUL lined with polyester suedecloth and bound with 1" fold-over elastic. It fastens with TouchTape brand hook-and-loop.


Diaper covers made with PUL can also be done in turn-and-topstitch style, where the inner and outer layers are first sewn right-sides-together and then turned right-side-out through a hole. The diaper cover is then topstitched, making sure to close the turning hole.

This diaper cover from Fruit of the Womb Diapers is made with 1mil polyester PUL with "wing" accents and lining of polyester microfleece. It is finished turn-and-topstitch style, and fastens with polyacetal resin (plastic) snaps.


The recommendation?


PUL diaper covers made with polyester are an excellent choice for car trips, overnight, or heavy wetters, because they provide the greatest level of moisture protection. Cotton that has been laminated makes cute daytime covers, but will be prone to wicking and is not recommended for extended wear.

The pattern suggestions?

On the for-sale pattern side, everything-included kits from Diaper Kit or Kayla's Cloth Kits are again recommended. The Little Comet Tails Little Starter and Darling Diapers patterns are also popular, versatile patterns that include instructions for assembling a variety of styles from different fabrics.

On the for-free pattern side, try the Miala hook-and-loop fastening turn-and-topstitch pattern, or the Chloe Toes side-snapping FOE-bound pattern.

Cloth Diaper Styles: the All-In-Two (AI2)

We talked about the All-in-One diaper style. All-in-Twos are the best attempt to keep the "disposable-like" ease of use while addressing the drawbacks of the AIO style. There are two main types of AI2s. First, let's talk about:

Snap-in Soakers

This style of AI2 has a waterproof outer and a soft (sometimes absorbent) inner, to which an absorbent "soaker" is attached to keep it in place. Some AI2s can have just the snap-in part replaced for diaper changing purposes, while other styles (the ones with an absorbent inner material) should be completely changed.
These serged edge snap-in soaker style AI2s are from Yonder Tree.


Pocket "All-in-One" Diapers

This style of AI2 has a waterproof outer with a permeable inner. There are no absorbent layers attached, but there is an opening for "stuffing" an absorbent material into the "pocket" between the two layers. The location of the pocket opening varies depending on the brand. The permeable inner layer can be made from an absorbent fabric like cotton flannel, or for a "stay-dry" effect against baby's skin, wicking synthetics like microfleece or suedecloth can be
used. Regardless of the inner material, if a pocket diaper is used with the absorbent "stuffer" in the pocket, the entire diaper needs to be changed every time.This pocket diaper is from Fruit of the Womb Diapers, and is made with a PUL outer and a microfleece inner with a sham-style pocket opening. It is shown "stuffed" with a contour-shaped terrycloth insert.


Both AI2 styles fulfill their purpose--they are easier to clean thoroughly, dry faster, and are more customizable than AIO styles. However, they have a drawback in that the absorbent parts need to be matched up to the outer after washing and drying. But if you don't mind pre-stuffing or pre-snapping, AI2s are also excellent for daycare, babysitters, and other caretakers who are unfamiliar with cloth, because once assembled, they go on "like a disposable".


The recommendation?


AI2 styles are easy to use and easier to care for than AIOs. An entire "stash" made of either AI2 style would be feasible, although slightly more expensive than using one of the other combination systems we will discuss later this week.

Pocket diapers are the easier version for those new to sewing. For several reasons, I recommend using polyacetal resin snaps for snap-in soaker styles, and plastic snaps require a special press and die set to apply. Because of the investment in special equipment, snap-in soaker styles are not the best style for a beginner or casual home diaper seamstress.

The pattern suggestions?

On the for-sale pattern side, try the excellent pocket diaper kits from Kayla's Cloth Kits, Diaper Kit, or the Darling Diapers pattern.

On the for-free pattern side, try one of the Wee Weka pocket patterns from The Nappy Network, the Mamabird pattern variation, or
this neat back-fastening PUL pocket.

Next, let's talk about diaper covers!

Cloth Diaper Styles: the All-In-One (AIO)


We'll start this discussion with the "most 'sposie-like" diaper and work our way back to cloth diapering's roots. First on the list:

The All-in-One (aka AIO) Diaper
.

AIOs are just as the name says--everything you need in one package. The waterproof cover is attached to absorbent inner layers, and it fastens with hook-and-loop ("Velcro") or snaps.

AIOs are great for daycare centers, babysitters, husbands (LOL!) and trips, because you don't have to deal with a separate diaper and cover, and AIOs tend to be a bit trimmer than other styles, so you can easily put a few in a diaper bag and just go :)

There are two main drawbacks to the AIO style, both of which have to do with washing care. Because the waterproof cover is attached to the absorbent inner, it can be harder to get an AIO really clean and rinsed out. And the water proof layer won't last as long, because it gets the same washing treatment that is required to keep the insides bacteria (smell and rash) free! Some secondary problems with AIOs can be increased "blow-outs" in young babies (especially breastfed ones), and the dramatically increased drying time. Drying time can be reduced by using a "flap style" soaker layer, or by switching to the next style, the All-in-Two (AI2)!


Recommendation?

AIOs are nice to have for the situations I listed (babysitters, trips), but I don't suggest having an entire "stash" made of them.


The pattern suggestions?


One the for-Sale pattern side, check out the Little Starter pattern from Little Comet Tails!
For the ultimate hand-held diaper sewing experience, check out sew-your-own kits from Kayla's Cloth Kits or Diaper Kit!

On the for-free pattern side, Celtic Cloth Wholesale has a size-medium AIO pattern or Mamabird has 3 sizes of AIO patterns. The Mamabird pattern is known to run small, so if your child is between sizes, you will likely want to size up.


Next up, a discussion on All-in-Two (AI2) diapers!

Sewing Your Own Cloth Diapers?

"Fitted? AIO? Pocket? I'd love to sew my own cloth diapers, but I don't even know what the names mean!"

It's a question heard over and over, because unlike the "Six-sizes-fits-none" disposable diaper, there are choices in cloth diapering! Each style has its own benefits as well as drawbacks, but to someone new to cloth diapering, the information can be overwhelming!

This series will take a look at each style of cloth diaper, and I'll have suggestions for patterns (both free and for-purchase) for each style. Stay tuned, there's lots of great info to come!

Wednesday, October 31, 2007

How to Modify a Drill Press For Use as a Snap Press

So you'd like to use "plastic" (polyacetal resin) snaps for cloth diapers, mama pads, bibs, clothes, and household items, but the expense of a snap press is deterring you? If you have access to a drill press, you can very easily "make" your own snap press for only the cost of the snap dies and a small piece of wood!

**WARNING: Your drill press should be a high-quality one with all metal gears. Plastic gears will be cracked and break under the pressure of pressing the snap pieces together.

A snap press works by holding a CAP and a SOCKET or STUD in place and applying force to the "prong" of the cap so that it is "smooshed" down and locked into place in the hole of the socket or stud. A drill press has straight-up-and-down motion (lining the parts up correctly), and is ideal for a "homemade" snap press because the "chuck" that accepts the drill bit will easily accept the shank of a snap die without modification.


STEP ONE:
Order snap press dies and snaps from http://www.thesnapstore.com or http://www.verybaby.com . A die set to apply the snaps will consist of 3 die pieces: a CAP die, a SOCKET die, and a STUD die. A cap will go on the opposite side of a socket or stud, adhering it to the fabric. If you "mix and match" your order of snaps (instead of buying "complete sets"), make sure you buy a number of caps equal to the combined number of studs and sockets (ie, a complete snap is made up of one stud, one socket, and two caps) for each color that you want sets of.

STEP TWO:
When your snap dies arrive, drill a hole in a piece of wood for the cap die shank to fit snugly in (you don't want the die to move around while pressing the piece together). The board with the hole drilled is shown the in the picture below. According to the information on their websites, the cap die from Very Baby has a 3/8" shank, the cap die from The Snap Store has a 1/2" shank. Put the cap die in the hole.


STEP THREE:
Put the shank of either the socket or stud die in the open chuck of the drill press. Tighten the chuck to hold the die securely. The stud die is shown in the chuck of the drill press in the picture above.

STEP FOUR:
Place the piece of wood on the working surface of the drill press so that the cap die is lined up with the socket or stud die in the chuck above it. Be careful during this step, if the dies aren't centered, the snaps won't "smoosh" together properly and won't lock together. Once you have the die placed properly, use C-clamps or other strong clamps to secure the piece of wood to the working surface, being careful not to shift the wood as you clamp it.


STEP FIVE:
Start snapping!

There are two methods for marking and placing the snaps.

The first method is the "tap, tap, tap, press" method. Make a mark on the fabric where the snap is to be applied. Put a socket (or stud) piece in the upper die, and place the prong of the cap die on the mark. Settle the cap into the lower die. Keeping the fabric still, lower the press and "tap, tap, tap" with the socket piece until the cap prong pokes through the fabric and then press the pieces completely together.


In the second method, you will be making a hole for the cap prong. Use an awl and a hammer or a leather punch. You only need a very small hole, and making too large of a hole will cause the snap to pull out of the fabric. Place the cap in the die, put the prong through the hole in the fabric, and press.

Making a hole first by using one of these two methods will reduce the number of "failed" snaps--ones where the prong does not go through the fabric and is not pressed and locked into place in the hole of the stud or socket piece.


Pressing the snap pieces together.


CONGRATULATIONS, YOU'VE JUST "MADE" A SNAP PRESS! Now find some stuff that needs snapping! ;)